Home » Help center
Extensions
Active phone number
search and purchase

How to Manage Extensions in NextelcoAI

Extensions allow you to streamline your communication processes by creating additional numbers or sub-lines linked to your main phone number. Follow these steps to add and manage extensions in the NextelcoAI dashboard.


Steps to Add and Manage Extensions

1. Log in to Your Account

Ensure you are logged in to your NextelcoAI account.

2. Navigate to the Extensions Section

  • On the left-hand menu, locate and click on Phone Numbers.
  • Under this section, select Extensions.


3. Add a New Extension

  • Click the Add New Extension button.

  • Fill in the required details:
  • Number: Enter the extension number.
  • Name: Provide a name for the extension.
  • Password: Set a secure password.

4. Configure Extension Settings

  • Set the Outbound Caller ID by selecting the linked phone number.
  • Specify the Directory Listing details: enter first and last name and check visibility if you want it listed.
  • Enter the first and last name.
  • Check the visibility box if you want this contact listed in the system’s directory.

5. Save the Extension

  • Click the Create button to save the new extension.

6. Manage Existing Extensions

  • Use the Actions button next to an extension to edit, deactivate, or delete it.
  • Adjust individual settings as needed, such as voicemail preferences or directory visibility.

Add New Contact
View Contacts

How to Add a New Contact List


Steps to Add New Contact List

1. Log in to Your Account

Ensure you are logged in to your NextelcoAI account.

2. Navigate to Contacts > Contact Lists

3. Click the Add New button on the top right.

4. Fill in the following fields:

  • List Name: Enter a name for your new contact list.

5. Choose How to Add Contacts to the list:

  • Import File: Upload a .CSV file. Ensure your file matches the provided template.
  • Add Manually: Enter contact details individually.

6. Click Save to create your new contact list.

Campaign Listing and filter
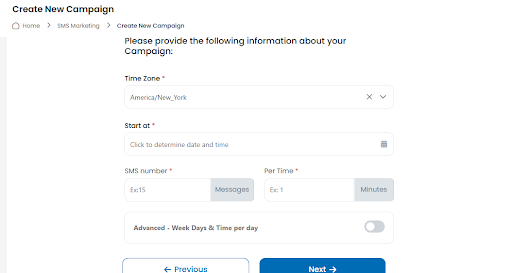
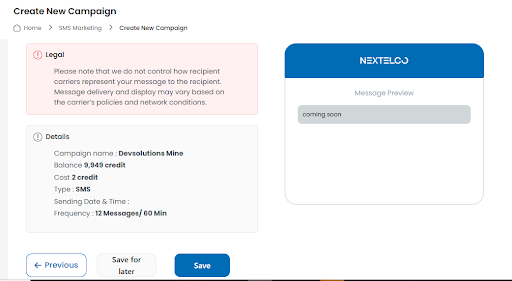
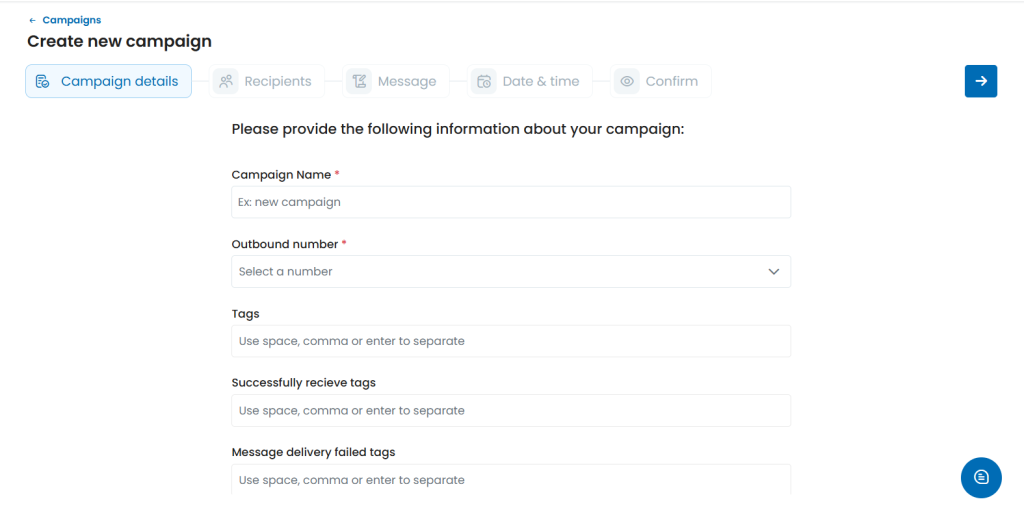
New SMS Campaign

How to Access the Campaign List

Steps to access the campaign list

1. Log in to your NextTelco account

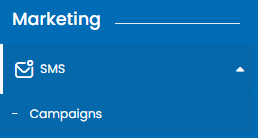
2. Navigate to the left-hand menu and select Marketing > SMS > Campaigns

3. Click on Voicemail and then select Audio Files.

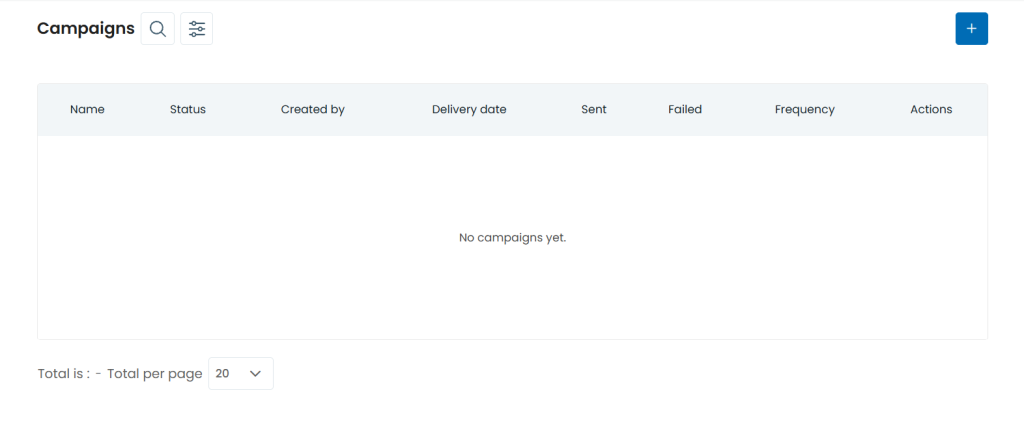
4. The campaign list will appear on your screen, displaying the following details for each campaign:

  • Name
  • Status (Draft, Scheduled, Sent, etc.)
  • Created By
  • Delivery Date
  • Sent Messages
  • If no campaigns have been created yet, the list will show “No Campaigns Yet.”


5. Using the Advanced Filter

The Advanced Filter helps you quickly locate specific campaigns based on multiple criteria. Here’s how to use it:

  • Open the Filter Panel:
  • Click the Filter button on the right-hand side of the campaign list.

  • Set Filter Criteria:
  • Status: Choose the campaign’s status from the dropdown menu (e.g., Draft, Scheduled).
  • Created By: Select the creator of the campaign.
  • Date Range: Use the From and To fields to specify a start and end date.

  • Apply Filters:
  • Once you’ve entered the filter criteria, click Filter.
  • The list will update to show only the campaigns matching your selection.
  • Reset Filters:
  • To clear the filters and view all campaigns again, click Reset.
Voicemail Logs
AI Text to Speech
AI Clone
Upload New Audio File
Audio Files Listing and Filter
New Voicemail Campaign
Campaigns Listing and Filter

How to View and Manage Voicemail Logs in NextelcoAI

Voicemail Logs provide a detailed overview of your voicemail campaigns and individual messages. Follow the steps below to access and manage your voicemail logs.


Steps to Access Voicemail Logs

1. Log in to Your NextelcoAI Account

2. Navigate to the Voicemail Logs Section

  • From the left-hand menu, go to Marketing > Voicemail > Logs.
  • You will see a list of voicemail logs displayed.

3. Search for Specific Logs

  • Use the search bar at the top to find logs by contact or campaign name.

  • Apply filters by clicking on the Filter button to narrow results based on criteria like date or status.

4. Export Voicemail Logs

  • Click on CSV Export to download a file of your voicemail logs for offline use.

5. Review Log Details

  • Each entry includes the following:
  • From: The sender’s number.
  • To: The recipient’s number.
  • Contact: The recipient’s name or ID.
  • Duration: The length of the voicemail.
  • Time: The timestamp of when the voicemail was sent.
  • Campaign Name: The associated campaign.
  • Recording: Access the voicemail recording (if available).

Campaigns Listing and Filter
Create New Verified Senders
Emails Templates
New Email Campaign

How to Use Email Campaigns Listing and Filtering in NextelcoAI

The Email Campaigns section allows you to manage your email marketing campaigns effectively. You can view, filter, and organize your campaigns with ease. Follow the guide below to navigate and use these features.

Steps to Access Email Campaigns

1. Log in to your NextelcoAI account

2. Navigate to the Email Campaigns Section

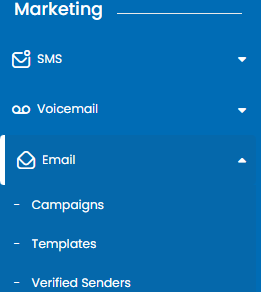
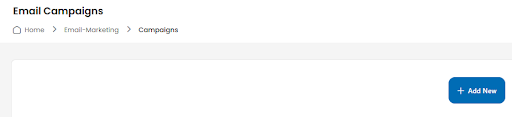
  • From the left-hand menu, go to Marketing > Email > Campaigns.

  • You will see a list of your email campaigns with the following details:
  • Name: The title of the campaign.
  • Status: The current state (e.g., Sent, Draft, Scheduled).
  • Created By: The user who created the campaign.
  • Delivery Date: The date the email campaign was sent or scheduled to be sent.

How to Use the Advanced Filter

1.Open the Filter Panel:

  • Click on the Filter button in the top-right corner of the screen.

2.Filter Options

  • Name: Search campaigns by their name.
  • Created By: Filter by the user who created the campaign.
  • Status: Choose a status (e.g., Sent, Draft, Scheduled).
  • From: Select a start date to filter campaigns by creation or delivery date.
  • To: Select an end date to narrow down the range.

3. Apply Filters

  • Once you’ve entered the desired criteria, click Filter to apply the filters.
How to Manage Retries in NextelcoAI
Call logs
Dispositions Management
Phone Blocks Management
Agents Management
Teams management
Create New Campaign
Lisitng campaigns

How to Manage Retries in NextelcoAI

The Retries module in NextelcoAI allows administrators to configure and manage call retry strategies for the Call Center system. This feature helps improve call connection rates by automatically retrying failed or unanswered calls based on predefined retry modes and settings.

The Retries management page contains a data table with information such as Name, Mode, and Actions, enabling users to create, modify, and manage retry configurations efficiently.

Video Tutorial:

Steps to Manage Retries

Step 1: Navigate to the Retries Module

  1. Log in to your NextelcoAI account.
  2. From the left-side menu, navigate to:
    Customer Support → Call Center → Retries
  3. The Retries management page will display all existing retry configurations.

Retries Management Overview

The Retries page provides a table containing the following columns:

Column

Description

Name

Name of the retry configuration

Mode

Retry mode applied to the configuration

Actions

Options to edit or delete the retry configuration

Available Retry Modes

General Mode

  • Basic retry strategy for standard call operations.
  • Suitable for most outbound call campaigns.
  • Uses default retry rules and intervals.

Advanced Mode

  • Provides greater flexibility and customization.
  • Allows more detailed retry behavior based on business requirements.
  • Ideal for complex call workflows and specialized campaigns.

Create a New Retry Configuration

  1. Click the Add New or Create Retry button (if available).
  2. Enter a unique Name for the retry configuration.
  3. Select the desired Mode (General or Advanced).
  4. Configure any additional retry settings.
  5. Click Save to create the new retry profile.

Edit an Existing Retry Configuration

  1. Locate the retry entry in the table.
  2. Click the Edit icon under the Actions column.
  3. Update the required settings.
  4. Save the changes to apply the updated retry configuration.

Delete a Retry Configuration

  1. Find the retry configuration you want to remove.
  2. Click the Delete icon under the Actions column.
  3. Confirm the deletion when prompted.
  4. The selected retry configuration will be permanently removed.

Best Practices for Retry Management

  • Use meaningful names for retry profiles.
  • Apply General Mode for standard calling scenarios.
  • Use Advanced Mode only when specialized retry behavior is required.
  • Periodically review retry configurations to optimize call performance.
  • Remove unused retry profiles to maintain a clean and organized system.

Benefits of Using Retries

  • Increases call connection opportunities.
  • Improves outbound campaign effectiveness.
  • Reduces manual call management efforts.
  • Supports flexible call center workflows.
  • Enhances overall customer communication success rates.

Conclusion

The Retries module in NextelcoAI provides an easy and effective way to manage call retry strategies. By configuring appropriate retry modes and maintaining well-organized retry profiles, administrators can improve call center efficiency and maximize customer engagement outcomes.

Steps to Manage  in Retries

Customer Support > Call Center > Retries  

Chat
Carrier Registration
Usage
Logs

How to Use Messaging – Chat

The Messaging – Chat feature allows you to send and receive messages to and from your contacts directly within the platform. This feature streamlines communication and provides an easy-to-use interface for managing conversations.


Steps to Start a Chat

1. Log in to your account and navigate to the Messaging section in the left-hand menu.

2. Click on Chat under the Messaging options.

3. On the Chat page, you will see the following:

  • A search bar to find contacts or numbers.
  • A message area on the right side of the screen for active chats.

4. To start a new chat:

  • Select a Sender ID from the drop-down menu at the top of the page.
  • Enter the contact’s phone number or search for an existing contact in the search bar.
  • Once the contact is selected, a chat window will appear on the right.
  • Type your message in the message box at the bottom right and click the Send button (paper plane icon).

Managing Chats

  • Search in Chat: Use the search bar on the right to find specific messages or keywords within your current chats.

  • Active Chats: View ongoing conversations in the chat area.
  • No Available Contacts: If there are no contacts listed, ensure you have uploaded or saved contacts in the platform.


What is NexTelcoAI
What does NexTelcoAI do
What is NexTelcoAI CE
What is NexTelcoAI WE
What is NexTelcoAI WFA
What is NexTelcoAI Cloud

What is NexTelcoAI

NexTelcoAI appears to be an AI-powered telecom/business communications platform available as a mobile app (Android and iOS), developed by DevSolutions Group. Based on its public app listings, it is designed to help businesses manage calls, messages, voicemails, sales activity, and customer interactions from one system.


What it does
Key features described publicly include:
  • AI-powered insights for call performance and user activity
  • Smart call handling such as routing, voicemail transcription, and automated responses
  • Unified communications for calls, messages, and voicemails
  • Sales/customer management with team performance and commissions tracking
  • Team collaboration by assigning calls/messages internally
  • Secure & scalable tools for business use
Extensions
Active phone number
search and purchase

How to Manage Extensions in NextelcoAI

Extensions allow you to streamline your communication processes by creating additional numbers or sub-lines linked to your main phone number. Follow these steps to add and manage extensions in the NextelcoAI dashboard.


Steps to Add and Manage Extensions

1. Log in to Your Account

Ensure you are logged in to your NextelcoAI account.

2. Navigate to the Extensions Section

  • On the left-hand menu, locate and click on Phone Numbers.
  • Under this section, select Extensions.


3. Add a New Extension

  • Click the Add New Extension button.

  • Fill in the required details:
  • Number: Enter the extension number.
  • Name: Provide a name for the extension.
  • Password: Set a secure password.

4. Configure Extension Settings

  • Set the Outbound Caller ID by selecting the linked phone number.
  • Specify the Directory Listing details: enter first and last name and check visibility if you want it listed.
  • Enter the first and last name.
  • Check the visibility box if you want this contact listed in the system’s directory.

5. Save the Extension

  • Click the Create button to save the new extension.

6. Manage Existing Extensions

  • Use the Actions button next to an extension to edit, deactivate, or delete it.
  • Adjust individual settings as needed, such as voicemail preferences or directory visibility.

Add New Contact
View Contacts

How to Add a New Contact List


Steps to Add New Contact List

1. Log in to Your Account

Ensure you are logged in to your NextelcoAI account.

2. Navigate to Contacts > Contact Lists

3. Click the Add New button on the top right.

4. Fill in the following fields:

  • List Name: Enter a name for your new contact list.

5. Choose How to Add Contacts to the list:

  • Import File: Upload a .CSV file. Ensure your file matches the provided template.
  • Add Manually: Enter contact details individually.

6. Click Save to create your new contact list.

Campaign Listing and filter
New SMS Campaign

How to Access the Campaign List

Steps to access the campaign list

1. Log in to your NextTelco account

2. Navigate to the left-hand menu and select Marketing > SMS > Campaigns

3. Click on Voicemail and then select Audio Files.

4. The campaign list will appear on your screen, displaying the following details for each campaign:

  • Name
  • Status (Draft, Scheduled, Sent, etc.)
  • Created By
  • Delivery Date
  • Sent Messages
  • If no campaigns have been created yet, the list will show “No Campaigns Yet.”


5. Using the Advanced Filter

The Advanced Filter helps you quickly locate specific campaigns based on multiple criteria. Here’s how to use it:

  • Open the Filter Panel:
  • Click the Filter button on the right-hand side of the campaign list.

  • Set Filter Criteria:
  • Status: Choose the campaign’s status from the dropdown menu (e.g., Draft, Scheduled).
  • Created By: Select the creator of the campaign.
  • Date Range: Use the From and To fields to specify a start and end date.

  • Apply Filters:
  • Once you’ve entered the filter criteria, click Filter.
  • The list will update to show only the campaigns matching your selection.
  • Reset Filters:
  • To clear the filters and view all campaigns again, click Reset.
Voicemail Logs
AI Text to Speech
AI Clone
Upload New Audio File
Audio Files Listing and Filter
New Voicemail Campaign
Campaigns Listing and Filter

How to View and Manage Voicemail Logs in NextelcoAI

Voicemail Logs provide a detailed overview of your voicemail campaigns and individual messages. Follow the steps below to access and manage your voicemail logs.


Steps to Access Voicemail Logs

1. Log in to Your NextelcoAI Account

2. Navigate to the Voicemail Logs Section

  • From the left-hand menu, go to Marketing > Voicemail > Logs.
  • You will see a list of voicemail logs displayed.

3. Search for Specific Logs

  • Use the search bar at the top to find logs by contact or campaign name.

  • Apply filters by clicking on the Filter button to narrow results based on criteria like date or status.

4. Export Voicemail Logs

  • Click on CSV Export to download a file of your voicemail logs for offline use.

5. Review Log Details

  • Each entry includes the following:
  • From: The sender’s number.
  • To: The recipient’s number.
  • Contact: The recipient’s name or ID.
  • Duration: The length of the voicemail.
  • Time: The timestamp of when the voicemail was sent.
  • Campaign Name: The associated campaign.
  • Recording: Access the voicemail recording (if available).

Campaigns Listing and Filter
Create New Verified Senders
Emails Templates
New Email Campaign

How to Use Email Campaigns Listing and Filtering in NextelcoAI

The Email Campaigns section allows you to manage your email marketing campaigns effectively. You can view, filter, and organize your campaigns with ease. Follow the guide below to navigate and use these features.

Steps to Access Email Campaigns

1. Log in to your NextelcoAI account

2. Navigate to the Email Campaigns Section

  • From the left-hand menu, go to Marketing > Email > Campaigns.

  • You will see a list of your email campaigns with the following details:
  • Name: The title of the campaign.
  • Status: The current state (e.g., Sent, Draft, Scheduled).
  • Created By: The user who created the campaign.
  • Delivery Date: The date the email campaign was sent or scheduled to be sent.

How to Use the Advanced Filter

1.Open the Filter Panel:

  • Click on the Filter button in the top-right corner of the screen.

2.Filter Options

  • Name: Search campaigns by their name.
  • Created By: Filter by the user who created the campaign.
  • Status: Choose a status (e.g., Sent, Draft, Scheduled).
  • From: Select a start date to filter campaigns by creation or delivery date.
  • To: Select an end date to narrow down the range.

3. Apply Filters

  • Once you’ve entered the desired criteria, click Filter to apply the filters.
How to Manage Retries in NextelcoAI
Call logs
Dispositions Management
Phone Blocks Management
Agents Management
Teams management
Create New Campaign
Lisitng campaigns

How to Manage Retries in NextelcoAI

The Retries module in NextelcoAI allows administrators to configure and manage call retry strategies for the Call Center system. This feature helps improve call connection rates by automatically retrying failed or unanswered calls based on predefined retry modes and settings.

The Retries management page contains a data table with information such as Name, Mode, and Actions, enabling users to create, modify, and manage retry configurations efficiently.

Video Tutorial:

Steps to Manage Retries

Step 1: Navigate to the Retries Module

  1. Log in to your NextelcoAI account.
  2. From the left-side menu, navigate to:
    Customer Support → Call Center → Retries
  3. The Retries management page will display all existing retry configurations.

Retries Management Overview

The Retries page provides a table containing the following columns:

Column

Description

Name

Name of the retry configuration

Mode

Retry mode applied to the configuration

Actions

Options to edit or delete the retry configuration

Available Retry Modes

General Mode

  • Basic retry strategy for standard call operations.
  • Suitable for most outbound call campaigns.
  • Uses default retry rules and intervals.

Advanced Mode

  • Provides greater flexibility and customization.
  • Allows more detailed retry behavior based on business requirements.
  • Ideal for complex call workflows and specialized campaigns.

Create a New Retry Configuration

  1. Click the Add New or Create Retry button (if available).
  2. Enter a unique Name for the retry configuration.
  3. Select the desired Mode (General or Advanced).
  4. Configure any additional retry settings.
  5. Click Save to create the new retry profile.

Edit an Existing Retry Configuration

  1. Locate the retry entry in the table.
  2. Click the Edit icon under the Actions column.
  3. Update the required settings.
  4. Save the changes to apply the updated retry configuration.

Delete a Retry Configuration

  1. Find the retry configuration you want to remove.
  2. Click the Delete icon under the Actions column.
  3. Confirm the deletion when prompted.
  4. The selected retry configuration will be permanently removed.

Best Practices for Retry Management

  • Use meaningful names for retry profiles.
  • Apply General Mode for standard calling scenarios.
  • Use Advanced Mode only when specialized retry behavior is required.
  • Periodically review retry configurations to optimize call performance.
  • Remove unused retry profiles to maintain a clean and organized system.

Benefits of Using Retries

  • Increases call connection opportunities.
  • Improves outbound campaign effectiveness.
  • Reduces manual call management efforts.
  • Supports flexible call center workflows.
  • Enhances overall customer communication success rates.

Conclusion

The Retries module in NextelcoAI provides an easy and effective way to manage call retry strategies. By configuring appropriate retry modes and maintaining well-organized retry profiles, administrators can improve call center efficiency and maximize customer engagement outcomes.

Steps to Manage  in Retries

Customer Support > Call Center > Retries  

Chat
Carrier Registration
Usage
Logs

How to Use Messaging – Chat

The Messaging – Chat feature allows you to send and receive messages to and from your contacts directly within the platform. This feature streamlines communication and provides an easy-to-use interface for managing conversations.


Steps to Start a Chat

1. Log in to your account and navigate to the Messaging section in the left-hand menu.

2. Click on Chat under the Messaging options.

3. On the Chat page, you will see the following:

  • A search bar to find contacts or numbers.
  • A message area on the right side of the screen for active chats.

4. To start a new chat:

  • Select a Sender ID from the drop-down menu at the top of the page.
  • Enter the contact’s phone number or search for an existing contact in the search bar.
  • Once the contact is selected, a chat window will appear on the right.
  • Type your message in the message box at the bottom right and click the Send button (paper plane icon).

Managing Chats

  • Search in Chat: Use the search bar on the right to find specific messages or keywords within your current chats.

  • Active Chats: View ongoing conversations in the chat area.
  • No Available Contacts: If there are no contacts listed, ensure you have uploaded or saved contacts in the platform.


What is NexTelcoAI
What does NexTelcoAI do
What is NexTelcoAI CE
What is NexTelcoAI WE
What is NexTelcoAI WFA
What is NexTelcoAI Cloud

What is NexTelcoAI

NexTelcoAI appears to be an AI-powered telecom/business communications platform available as a mobile app (Android and iOS), developed by DevSolutions Group. Based on its public app listings, it is designed to help businesses manage calls, messages, voicemails, sales activity, and customer interactions from one system.

What it does
Key features described publicly include:
  • AI-powered insights for call performance and user activity
  • Smart call handling such as routing, voicemail transcription, and automated responses
  • Unified communications for calls, messages, and voicemails
  • Sales/customer management with team performance and commissions tracking
  • Team collaboration by assigning calls/messages internally
  • Secure & scalable tools for business use
How to Manage DIDs in NextelcoAI
How to Manage Chatbot in NextelcoAI
How to Manage Account Settings  in NextelcoAI

How to Manage DIDs in NextelcoAI

The DID (Direct Inward Dialing) Management module in NextelcoAI allows administrators to manage phone numbers, monitor usage statistics, and control the availability of DIDs within the platform. This feature helps organizations efficiently organize inbound communication channels and track call-related metrics.

Video Tutorial:

Steps to Manage DIDs

Step 1: Navigate to DID Management

  1. Log in to your NextelcoAI account.
  2. From the left navigation menu, select Call Center.
  3. Click on DIDs to open the DID Management page.

DID Management Overview

The DID Management screen provides the following tools and information:

Search and Filter Options

  • Search Icon: Quickly locate specific DIDs using keywords or phone numbers.
  • Filter/Settings Icon: Apply filters and customize the DID list view based on your requirements.

DID Data Table

The DID table displays important information for each configured phone number, including:

Column

Description

Name

Name assigned to the DID

Vendor

Service provider associated with the DID

Destination

Destination number or routing target

Live

Current live status of the DID

Hour

Hourly call statistics

Day

Daily call statistics

Month

Monthly call statistics

Total

Total usage or call count

Status

Enable or disable DID availability

Managing DID Status

Enable or Disable a DID

  1. Locate the DID in the management table.
  2. Use the Status Toggle button to activate or deactivate the DID.
  3. Changes are applied immediately and reflected in the system.

View DID Performance

  • Monitor call activity through the Hour, Day, Month, and Total columns.
  • Use these metrics to analyze DID usage and performance trends.

Search for Specific DIDs

  1. Click the Search icon.
  2. Enter the DID name, destination number, or related details.
  3. Matching records will be displayed instantly.

Filter DID Records

  1. Click the Filter/Settings icon.
  2. Select the desired filtering criteria.
  3. Apply filters to narrow down the DID list and quickly locate relevant records.

Benefits of DID Management

  • Centralized management of all DIDs.
  • Quick activation and deactivation of phone numbers.
  • Real-time monitoring of DID usage statistics.
  • Improved call routing and resource management.
  • Efficient search and filtering capabilities.

Conclusion

The DID Management module in NextelcoAI provides a simple and effective way to manage phone numbers, monitor usage metrics, and control DID availability. By utilizing the search, filter, and status management features, administrators can efficiently oversee their organization’s inbound communication infrastructure.

A settings/filter icon and a search icon located next to the title.

Data Table Columns: A light gray navigation bar with headers for Name, Vendor, Destination, Live, Hour, Day, Month, Total, and Status.

Steps to Manage  DIDs

Call Center  > DIDs>